Sunday, October 28, 2012

Shining Jack-o-Lantern Paper Plate Craft

Happy Sunday!

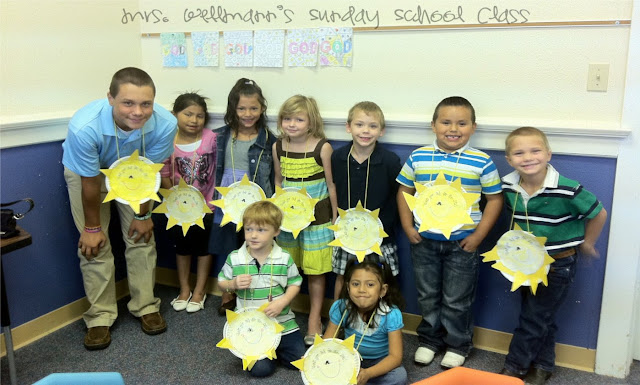
With this being the Sunday before Halloween we created these paper plate Shining Jack-o-Lanterns to remind us that God shines His light through us.  It was a perfect opportunity to explain to the kids that Halloween is about fun times and use it as a teaching moment.  

To give the jack-o-lantern the 3D effect glue or staple each plate backwards (to give sort of a bubble or open area between the plates).  

Every year my students love making these Shining Jack-o-lanters. So Fun!


Paper plates are one of my favorite materials to craft with.  I usually pick them up at the dollar store to keep on hand for crafting with my students. 

Supplies:
paper plates
black marker
yellow card stock or construction paper
brown construction paper or cardstock
glue 
stapler
orange crayon


Glue yellow circle on paper plate opposite of face; attach/glue brown stem in place. 
Attach face with glue or staple for additional hold.

Sunday, October 21, 2012

Creation Story ~ God Gives Us Animals (A Treat for the Birds)

As we continue our lessons on the Story of Creation this week we learn that God Gives Us the Animals to fill the beautiful earth.  At the beginning of Creation we already learned that God created The World, The Sun, Moon & Stars and also divided the world into Land & Sea.  This week we learn that God gave us Animals.  Animals can be soft, furry, tall, short, fat or skinny.  Some animals are our pets at home or we go to visit them at the zoo, beach, farm or other fun places.

Lesson - God Gives Us Animals
Snack - Animals Crackers
Craft - A Treat for the Birds & Paper Bag Animal Puppets
Coloring Page - Animals

We had 2 crafts this week including making a Treat for the Birds to hang outside and we also created Paper Bag Animals -- and made puppets out of them.


A Treat for the Birds 
Supplies:

  • bagels
  • peanut butter
  • birdseed
  • string

We dumped a little birdseed out on a paper plate.  Tie string through the hole of the bagel and knot at the top for hanging.  Spread peanut butter on one or both sides of the bagel and dip into the birdseed.  Place outside on a tree limb or other hanging spot as a special treat for the birds.

--------------

I found some free Paper Bag Puppet printables {here} and printed out several ones of the face (for time purposes).  I let the children could choose which one they would like.

Paper Bag Animal Puppets
Supplies:
  • brown lunch bags
  • paper bag printable from here
  • crayons
  • scissors
  • glue
Color animal, cut out and assemble animal accordingly.  


Sunday, October 14, 2012

Creation Story ~ God Gives Us Land (Fun Foam Plant Pokes)


The creator of Fun Foam is a pure genius because it is one of the best craft materials for small children (in my humble opinion)  You can find Fun Foam in the craft section is a variety of colors and designs.  Its color doesn't fade and it's easy to cut, glue and make cute little projects with.   Perfect for little hands to manipulate.
Since I have a class of boys and girls I had both flowers and sport balls for the children to choose from to make their plant poke. Of course, all of the girls chose the flowers and most all of the boys chose the sports ball.  So funny!
When planning a craft project for my students I've found it helpful to have everything ready to go where they only have to do up to 2 more steps during class.  
Last night I decided to add a cute smiley face to the center of the flower and my Peachy Keen faces were the perfect choice.  To ensure it wouldn't smear if it gets wet I used Black Staz On ink.  I stamped the faces onto fun foam and then used my Martha Stewart Circle Cutter to cut out the faces.  
The fun foam is too think for a circle punch. :(  
I had everything ready to go where all the children had to do was pick 2 flowers or balls for their plant poke.  
I gave them each a paper pennant to color and cut out for their stick. 
{freebie} - right click and save to your computer.
Insert as a picture into a document as many times as you need to.  Print and cut.  :)

Here are other crafty ideas I did with my students:
Creation Day 1 ~ Paper Plate World (God Created the World)
Creation Day 2 ~ Paper Plate Sun (God Gives Us Light)
Creation Day 3 ~ Water Bottles (God Gives Us Water)
~Tracy

Sunday, October 2, 2011

Thank You God for Water ~ {Bottle Labels} Free Printable

I thought it would be a fun idea to give each child a bottle of water to drink as we continue our lesson on Creation and explore the world as God made it.  Every living thing needs water and God gives us this precious gift.  Without water all living things will die.  These labels wrap around a bottle nicely -- secure around bottle with tape or adhesive.  I purchased the Nestle Pure Life Juniors and these are a perfect size for little hands.  I added blue curly ribbon to the top of the bottle because every gift needs a bow right?  Enjoy!!


{FREE PRINTABLE}
click to open in new window -- right click and save on your computer -
open a blank document -- insert as a picture onto a 8 1/2 x 11 and print


Sunday, September 25, 2011

God Made the Sun Paper Plate Project!

As our class continues to learn about Creation we learned that God divided the darkness calling the daytime "light" and the darkness "night".  The sun provides daytime light and the moon and stars provide night time light.  This is one of my favorite projects I do with my students and I'm happy to share it with you.


My "big" boy is a great helper with my class!  The kids just love him!!! 


My sweet boy -- he definitely loves craft projects!  :)


Supplies

  • paper plates
  • yellow yarn
  • yellow construction paper
  • face for sun -- see below for template
  • scissors
  • glue
  • hand held hole puncher
- for triangles (sun rays) - cut triangles out of yellow paper.  How many will depend on how many you want to put around each sun.
- punch 2 holes at the top of paper plate and attach yellow yarn.
- ask each child to color the face yellow before they attach to the paper plate (cut out the sun)
- attach yellow triangles (sun rays) to the plate and then glue on the sun's face.  

*extra tip* You can also add yellow crepe paper (2 strips) on the bottom of the sun (just staple to the bottom of the plate).  I've done this in the years past but didn't have any yellow crepe paper on hand.  
Enjoy!


click to enlarge - then right click and save to your computer. Print and make copies for your class.  


Saturday, September 17, 2011

God Made the Whole World Project

Welcome to our first project here at Mrs. Wellmann's Sunday School Class…..

Here is a great project you can do with your students (or kids) -- to remind them that God made the whole world and He made all things in it.

If you have a cricut machine, Give a Hoot cartridge has the perfect land designs for the globe/earth.  If you do not I found a template here you can cut out with scissors and trace onto green paper.


Supplies:
  • paper plates
  • green card stock or green construction paper
  • glue
  • blue crayon
  • Give a Hoot cricut cartridge - page 50 or use this template here.  


Have each child color the plate with blue crayon to signify water

Glue "land" pieces onto paper plate.  

Write "Thank you God for the World!" on bottom of plate.

Encourage the children to write or draw things on the back of the plate
that they like to see in the world.  This helps us remember to
thank God everyday for these gifts.  


Even more Craft ideas here!

Thursday, September 15, 2011

How to Teach Sunday School Tips!

I found these awesome tips from Ministry-to-Children.com and thought I'd share.  Sometimes I find myself over planning or under planning.  The most important thing I've learned is to be prepared and keep their little minds active.  This is one reason I started this blog was to help myself as a Sunday School teacher and share ideas with others.


As shared on the website {here}….
“Sunday Schools” were first established in the 1700′s in Britain to educate poor children on how to read and write. These children worked six days a week, were very poor and many were starving.
Today, public school systems teach our kids the “three R’s” but little about God or His Word. Enter the Sunday School teacher!
If you’ve decided to become a Christian educator, you are joining the ranks of a long, proud line of selfless servants who love God and kids. If you are learning how to teach Sunday School, there are some practical keys you should know. Once you have the basics, read our next article on becoming an awesome Sunday School teacher.
1. Know the ages of your children. The curriculum may cover several ages or grades but to really grab kids’ attention, you’ll need to apply the “Minute Rule.” If you teach 8-year olds, you have eight minutes to cover each section. If you teach 6-years, you’ll have 6 minutes. Keep the material appropriate for the age of the children.
2. Use the Bible translation preferred by your church. Some churches may prefer King James Version others may like teachers to use the New International Version. Double-check before you begin teaching.
3. Prepare ahead of time. Kids that see their teacher unprepared and unorganized will translate that to “She really doesn’t care about the class, or me.” Don’t wait till the night before or the morning of class to go over your listen. You’ll need time to gather your supplies and pray over the lesson.
4. Include a variety of activities. Don’t plan to talk the entire time. Kids need interaction, they like stretching their muscles. Include a section for physical movement, crafting and expressions of worship. This should be part of your weekly curriculum.
5. Promote attendance by using special charts or posters. Place star stickers next to each child’s name when they attend Sunday School. Use incentives for attendance like small prizes or fun activities.
6. Arrange the room in a kid friendly manner. Kids need the appropriate tables and chairs for comfort. Also, decorate with bright colors that draw kids’ eyes. Use cut out decorations like scenes from the Bible on a bulletin board or taped to the walls. Have Bible puzzles and coloring materials on tables waiting for kids who are early.
7. Use music. Play music softly in the background during the welcome portion of your Sunday School class. This sends a signal that class is about to begin.
8. Stick to the curriculum.  Some Sunday Schools teach the same subject to all grades at the same time. Don’t “go rogue” if you are having difficulties. Communicate with your Sunday School Superintendent. Let someone know if the curriculum is inappropriate.
9. Pray before the class and in the classroom. Incorporate an opening prayer and closing prayer into the lesson.
Sunday School is a wonderful way to educate children about God and His Word. Take some time to get to know the children and build relationships with each one. Kids love the teachers that love them!
Read more about Mimi at her website, Encouragement for Christians.